
Registering an LTI 1.3 Platform
An LTI platform is a Learning Management System that launches into NETLAB+
using LTI 1.3. The LMS is registered once, on the LTI Platforms
page, and each community that uses that LMS is then pointed at the registration
from the community’s own settings. One LMS may serve several communities; a
community uses one LMS.
Registering a platform records two things: what NETLAB+ needs to know about the
LMS (its issuer, client ID and endpoint addresses), and a signing keypair that
NETLAB+ uses to prove its own identity to that LMS. The LMS administrator, in
turn, needs a small set of addresses from NETLAB+. Those addresses are the same
for every LMS and are shown on the LTI Platforms page so they can be
handed over before anything else is done.
Note
LTI 1.1 does not use platform registrations. It continues to use the Consumer Key and Shared Secret held on each community, and the two versions may be used at the same time. See LTI 1.1 Keys.
There are three ways to register a platform, in the order worth trying:
Let the LMS register itself (Dynamic Registration). The LMS supplies its own addresses and issues NETLAB+ a client ID; nothing is transcribed by hand. This is the recommended method wherever the LMS supports it.
Start from a refused launch (Registering From a Refused Launch). An LMS that has already attempted a launch is recorded with the values it sent, and the registration form is pre-filled from them.
Register it by hand (Registering by Hand). Name the LMS product and its address, and NETLAB+ fills in the issuer and endpoints.
The LTI Platforms Page
Login to the NETLAB+ administrator account.
Click > Communities, then click
LTI Platforms at the bottom of the community list.
The page lists every registered platform with its issuer, client ID and status.
Below the list are the Register From an LMS (Dynamic Registration)
panel and, when an unregistered LMS has attempted a launch, the
Launches From Unregistered Systems panel.
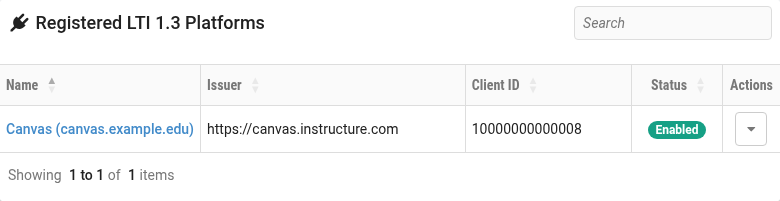
To open a platform, click its row. To register a new one by hand,
click Register Platform.
What the LMS Administrator Needs
Whichever registration method is used, the LMS administrator needs the same
values from NETLAB+, and has the same three decisions to make in the LMS. Both
are shown on the registration form and on every platform’s page, under
Values for the LMS Administrator and
What to Configure in the LMS.
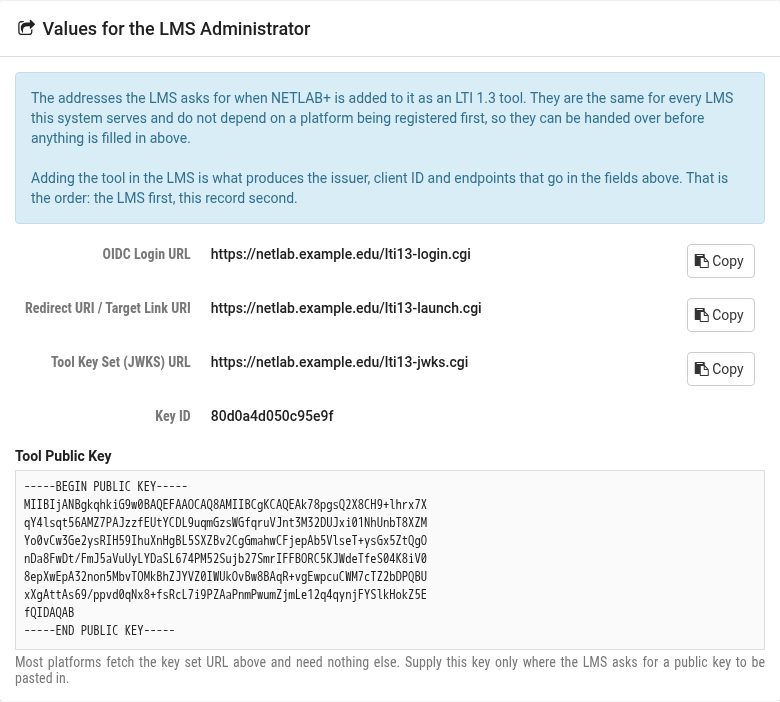
Values to give the LMS
- OIDC Login URL:
Where the LMS sends a user to begin a launch. Canvas calls this the OpenID Connect Initiation URL.
- Redirect URI / Target Link URI:
Where the LMS delivers the launch. Enter it as both the redirect URI and the target link URI where the LMS asks for them separately.
- Tool Key Set (JWKS) URL:
Where the LMS fetches NETLAB+’s public keys. Most platforms need nothing else. The
Key IDandTool Public Keyshown on a platform’s page are for the few products that ask for a public key to be pasted in instead.- Dynamic Registration URL:
Shown in the Dynamic Registration panel of the platform list. Used only for Dynamic Registration.
Each value has a Copy button beside it.
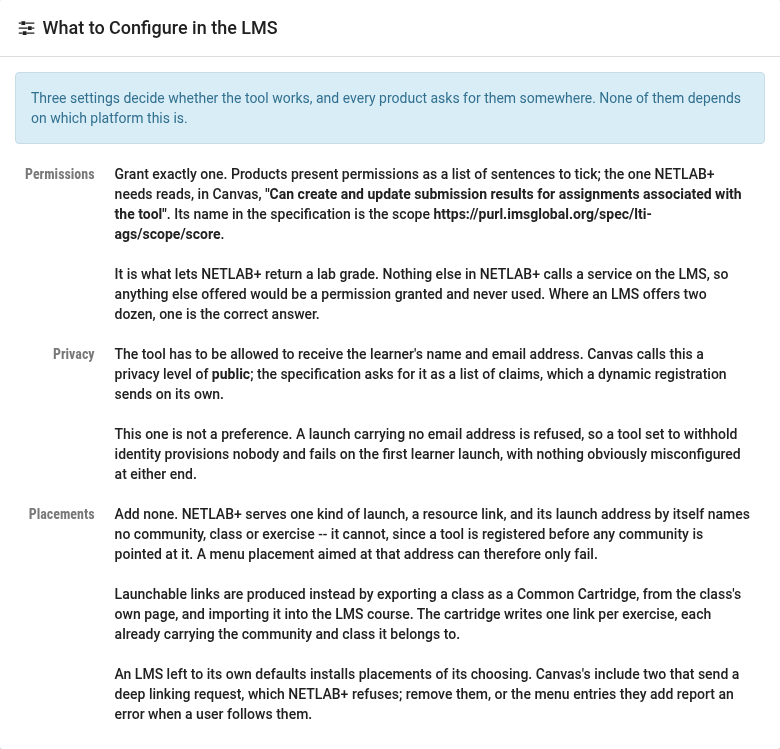
Settings to make in the LMS
- Permissions:
Grant exactly one: the permission that lets a tool create and update submission results (scores). In Canvas it reads “Can create and update submission results for assignments associated with the tool”. Its name in the LTI specification is the scope
https://purl.imsglobal.org/spec/lti-ags/scope/score. Nothing else in NETLAB+ calls a service on the LMS.- Privacy:
The tool must be allowed to receive the learner’s name and email address. In Canvas this is a privacy level of public. A launch that arrives without an email address is refused.
- Placements:
Add none. Lab links are placed by importing the class’s Common Cartridge into the course. Remove any placements the LMS installs by default, in particular any that send a deep-linking request, which NETLAB+ does not support.
Tip
The order matters for a registration by hand: add the tool in the LMS first, because that is what produces the client ID that goes into the NETLAB+ form. Dynamic Registration does this step for you.
Dynamic Registration
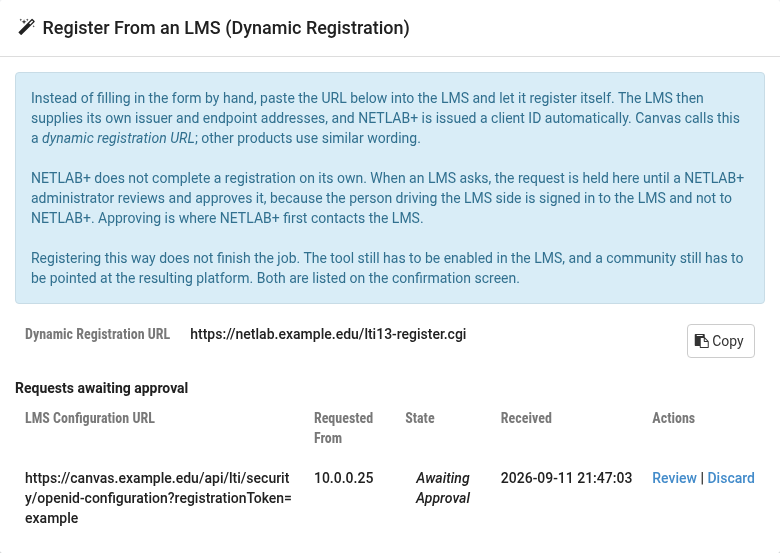
With Dynamic Registration, the LMS administrator pastes one NETLAB+ address into the LMS and the LMS registers itself: it sends NETLAB+ its issuer and endpoint addresses and issues a client ID, so nothing is transcribed by hand. Canvas calls the address a dynamic registration URL; other products use similar wording.
NETLAB+ does not complete a registration on its own. The request is held under
Requests awaiting approval until a NETLAB+ administrator reviews and
approves it, because the person driving the LMS side is signed in to the LMS,
not to NETLAB+. Approving is the first point at which NETLAB+ contacts the LMS.
Starting the Registration in the LMS
On the LTI Platforms page, copy the
Dynamic Registration URL from the
Register From an LMS (Dynamic Registration) panel and give it to the
LMS administrator.
The LMS administrator starts a new LTI registration in the LMS and pastes the URL where the LMS asks for it. In Canvas this is done from the account’s Developer Keys page by adding an LTI Registration and supplying the dynamic registration URL.
The LMS opens NETLAB+ inside its registration dialog. NETLAB+ records the request and shows a page stating that the request is awaiting approval by a NETLAB+ administrator. The LMS administrator can leave that dialog open; once the request is approved it finishes on its own.
Note
A registration request expires if it is not approved. How long the LMS’s one-time token lasts is decided by the LMS. If a request has expired, start the registration again from the LMS and a new request will appear.
Reviewing and Approving the Request
On the LTI Platforms page, under
Requests awaiting approval, find the request and click
Review.
The review page shows what the request arrived with: the LMS’s configuration URL, the address the request came from, and when it was received. Nothing has been read from the LMS yet and nothing has been created.
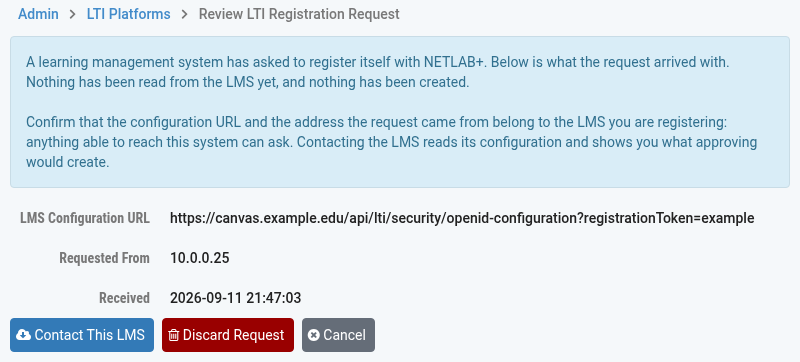
Warning
Anything able to reach the NETLAB+ system can submit a registration request.
Confirm that the configuration URL and the requesting address belong to the LMS
you expect before contacting it. Use Discard Request for a
request you do not recognize.
Click Contact This LMS. NETLAB+ reads the LMS’s
configuration using the one-time token the LMS supplied and shows the values it
will save: the product, issuer, endpoint addresses, and the permissions the LMS
offers. These values are not editable, since the LMS is the authority for its
own addresses.
Review the values, then click Approve and Register.
NETLAB+ sends its tool configuration to the LMS, receives a client ID, and creates
the platform.
Field Descriptions
- LMS Configuration URL:
The address of the LMS’s configuration document, as sent by the LMS. Confirm it belongs to your LMS.
- Requested From:
The IP address the request was submitted from. Normally the browser of the LMS administrator who started the registration.
- Product:
The LMS product, as reported in its configuration.
- Permissions:
The permissions the LMS offers NETLAB+. If the permission NETLAB+ needs for grade return is not among them, the platform is still created, but grades cannot be returned until it is granted in the LMS.
- Already Registered:
Shown when this LMS already has a platform registration on the system. See below.
Note
If the LMS is already registered. An LMS issues a new client ID every time it
registers, so approving a second request would create a second registration of
the same LMS rather than update the first. The review page names the existing
platform and offers Replace the existing registration. Left
unchecked, approval is refused and the request stays listed. When checked,
approving moves the existing platform’s communities, deployment IDs, LMS user
identities and pending grades onto the new registration and deletes the old one.
After Approval
The LTI Registration Complete page names the new platform and the
client ID the LMS issued, then lists what is Still Required. Read
this list; a dynamic registration on its own does not serve any launches.
- Enable the tool in the LMS, and make it available:
Most LMS products install the tool switched off. In Canvas, the registration dialog’s Enable & Close button turns the tool on but leaves it unavailable, which is a separate setting; open the tool under the account’s Apps and set it to Available. Until both are done a launch never reaches NETLAB+, nothing appears in the NETLAB+ logs, and a Canvas learner sees only “Couldn’t find valid settings for this link”.
- Install the tool in the LMS:
Some LMS products register a tool without installing it anywhere. Add it in the LMS using the client ID shown, then enable it.
- Point a community at this platform:
Edit each community that will use this LMS and select the platform in its
LTI 1.3 Platformfield. See Binding a Community to a Platform.- A deployment ID is still needed:
Most LMS products do not return a deployment ID during registration. See Deployment IDs below for how to obtain and record one.
Registering From a Refused Launch
When an LMS that is not registered attempts an LTI 1.3 launch, NETLAB+ refuses
the launch but records what the LMS sent about itself. The
Launches From Unregistered Systems panel then appears on the
LTI Platforms page, listing the issuer, client ID, deployment ID
and target link from each such LMS. The panel is not shown when nothing has
attempted a launch.
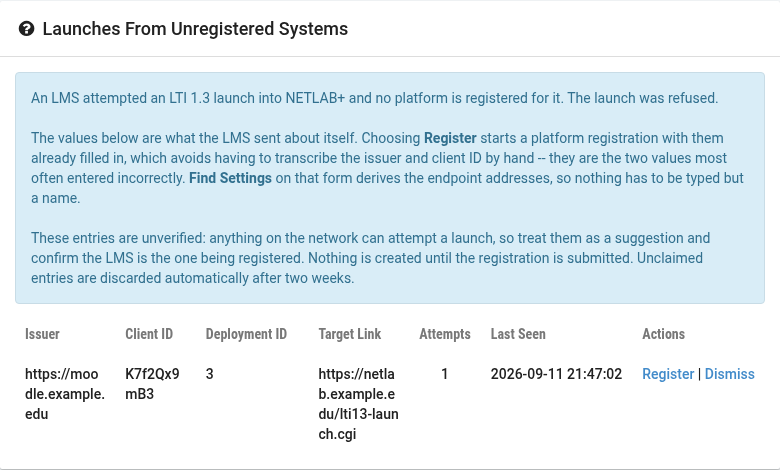
This is useful in two situations: when the LMS does not support Dynamic Registration, and when the LMS has already been set up with the NETLAB+ tool but the NETLAB+ side was never completed. The issuer and client ID are the two values most often mistyped in a manual registration, and here they arrive as the LMS sent them.
On the row for the LMS, click Register.
The Register LTI 1.3 Platform form opens with the issuer and client
ID already filled in, and the deployment ID the LMS sent shown below the form.
That deployment ID is registered against the platform automatically when the
form is submitted.
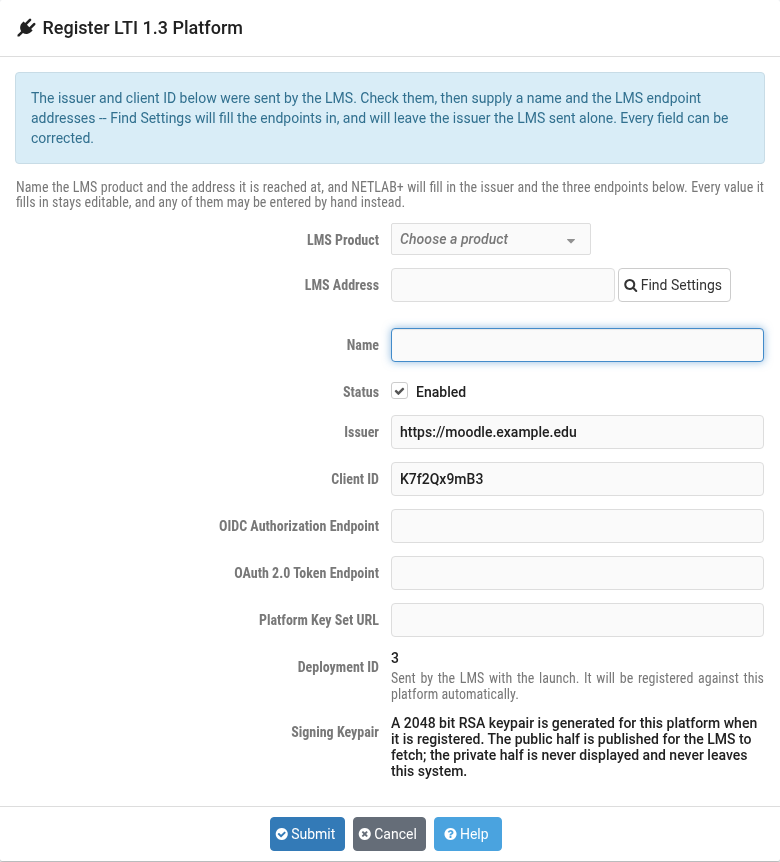
Choose the LMS Product, enter the LMS Address,
and click Find Settings to fill in the endpoint addresses. Find
Settings leaves the issuer the LMS sent alone.
Enter a Name and click Submit.
Warning
These entries are unverified: anything on the network can attempt a launch. Treat an entry as a suggestion, and confirm that the issuer and client ID are those of the LMS you intend to register before submitting. Nothing is created until the form is submitted.
To remove an entry you do not intend to act on, click
Dismiss. If that LMS attempts another launch it will be recorded
again. Unclaimed entries are discarded automatically after two weeks.
Registering by Hand
Use this method when the LMS does not support Dynamic Registration and has not yet attempted a launch. Add the tool in the LMS first, using the values under What the LMS Administrator Needs, and come back with the client ID the LMS issued.
On the LTI Platforms page, click
Register Platform.
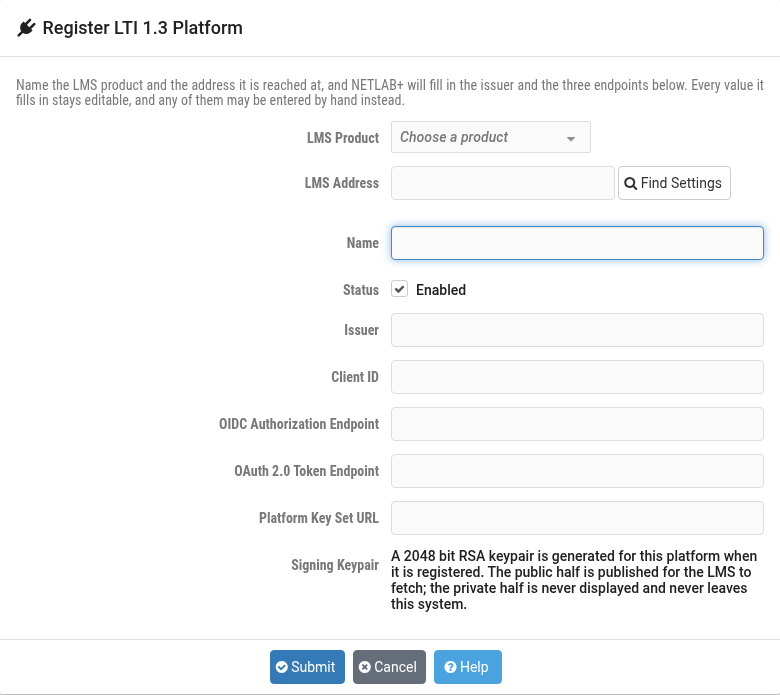
Choose the LMS Product and enter the LMS Address
people log in to the LMS at, then click Find Settings. NETLAB+
fills in the Issuer and the three endpoint addresses from what it
knows about that product. For a product that is not listed, choose
Other / not listed; NETLAB+ then asks the LMS itself for its
published settings, which most products answer.
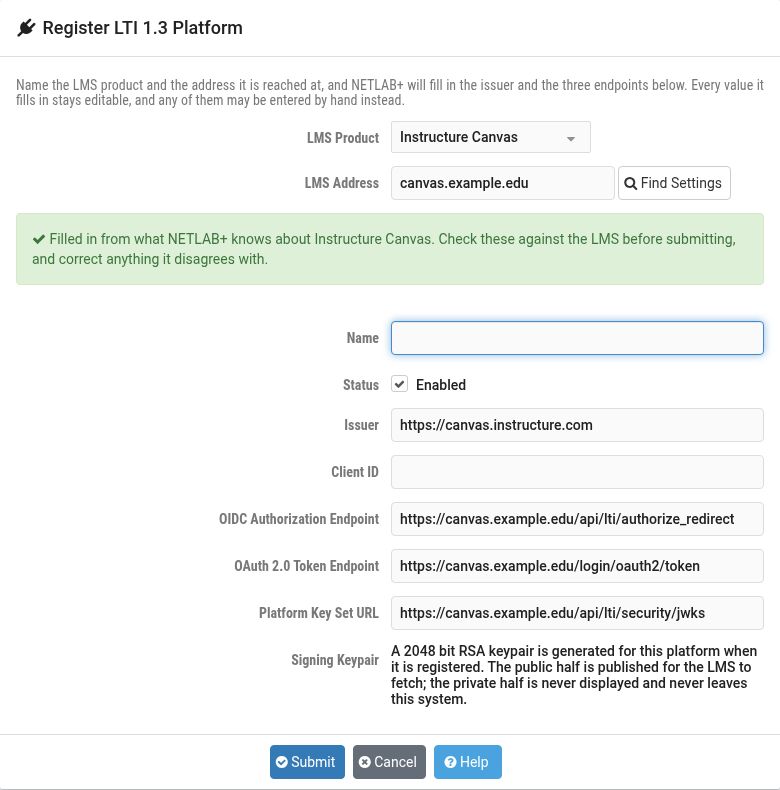
Check the filled-in values against the LMS’s own tool registration details and correct anything that disagrees. Every value stays editable.
Enter a Name and the Client ID the LMS issued,
then click Submit.
Field Descriptions
- LMS Product:
The product the LMS runs. Used by Find Settings to derive the issuer and endpoints. Choose Other for a product that is not listed.
- LMS Address:
The address people log in to the LMS at. A full URL may be pasted; only the host part is used.
- Name:
A label for this LMS, used only within NETLAB+. Something an administrator will recognize later, such as “Canvas, Main Campus”.
- Status:
Enable or disable LTI 1.3 launches from this LMS. While disabled, launches are refused and the tool key set is not published.
- Issuer:
The issuer identifier the LMS presents, from its LTI developer key or tool registration details. It must match exactly, character for character. It is often the address of the LMS, but not always: on Canvas the issuer is the fixed string
https://canvas.instructure.comfor every site, self-hosted ones included, and is not the address of your Canvas. Find Settings fills this in correctly.- Client ID:
The client ID the LMS assigned to NETLAB+ when the tool was added there. It does not exist until the tool has been added in the LMS.
- OIDC Authorization Endpoint:
The LMS endpoint NETLAB+ redirects a user to in order to begin a launch. Must be an https URL.
- OAuth 2.0 Token Endpoint:
The LMS endpoint NETLAB+ requests an access token from before returning a grade. Must be an https URL. A wrong value here is not noticed at launch; it surfaces later as a grade that never arrives.
- Platform Key Set URL:
Where the LMS publishes the public keys it signs launches with. NETLAB+ fetches it fresh for every launch, so a key rotation on the LMS needs no action here. Must be an https URL. This is the LMS key set, not the NETLAB+ one; the two are not interchangeable.
- Signing Keypair:
A 2048-bit RSA keypair is generated for the platform when it is registered. The public half is published at the Tool Key Set URL; the private half is never displayed and never leaves the system.
Tip
If the product you choose supports Dynamic Registration, Find Settings says so and shows the Dynamic Registration URL. Consider cancelling out of the form and using that instead, since none of the values then has to be entered by hand.
Viewing and Editing a Platform
On the LTI Platforms page, click the platform’s row.
The platform page shows the registration values, followed by the values and settings for the LMS administrator, then the platform’s deployment IDs and the communities that use it.
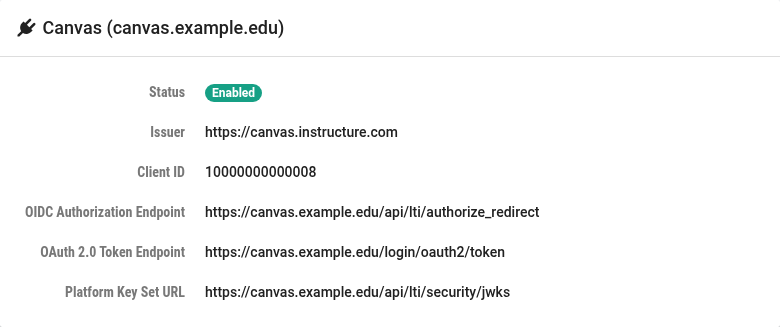
To change the name, status or any of the LMS values, click
Edit, make the changes and click Submit.
The fields are the same as on the registration form.
Tip
To stop all LTI 1.3 launches from an LMS temporarily, edit the platform and clear
Status. Launches are refused and the tool key set is withdrawn while
the platform is disabled; nothing else is changed, and re-enabling it restores
service.
Replacing the Signing Keypair
On the platform’s page, click Replace Keypair and
confirm.
A new keypair is generated and the old one is destroyed. A platform that fetches the Tool Key Set URL picks up the new key on its own, normally within a few minutes. A platform that was given the public key by hand will reject launches until the new key is pasted into it.
Deleting a Platform
On the platform’s page, click Delete and confirm.
Any LTI 1.3 tool registration for this LMS stops working: the Tool Key Set URL no longer resolves, and the keypair is destroyed with the registration.
Note
A platform cannot be deleted while a community is pointed at it, or while grades from completed lab sessions are still waiting to be posted to it. The page says how many of each. Point those communities at a different platform or clear their LTI 1.3 settings, let any waiting grades finish posting, and then delete the registration.
Deployment IDs
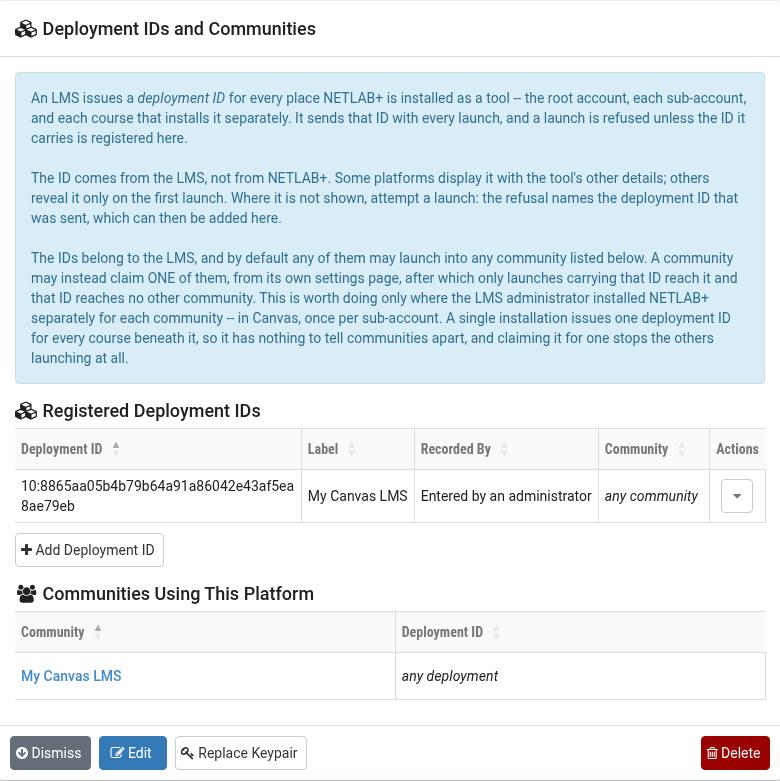
An LMS issues a deployment ID for every place NETLAB+ is installed as a tool: the root account, each sub-account, and each course that installs it separately. The LMS sends that ID with every launch, and NETLAB+ refuses a launch unless the ID it carries is registered on the platform. The IDs belong to the LMS; by default any of them may launch into any community that uses the platform.
Finding the Deployment ID
The ID comes from the LMS, not from NETLAB+, and it arrives in one of three ways:
Supplied by Dynamic Registration. Some LMS products return it during registration and it is recorded automatically. Most, including production Canvas, do not.
Observed on a launch. Attempt a launch from the LMS course. If the ID is not yet registered, the refusal message names the deployment ID that was sent. A launch from an LMS that is not registered at all records the ID under
Launches From Unregistered Systems, and registering from there carries it over.Read from the LMS. Some products display the deployment ID with the tool’s other details. In Canvas it is shown in the tool’s configuration under the account’s Apps.
Warning
IDs issued from neighbouring places in the same LMS often differ by a single leading character. Copy the value exactly as the LMS sends it; leading digits, colons and case all matter.
Adding a Deployment ID
On the platform’s page, under Registered Deployment IDs,
click Add Deployment ID.
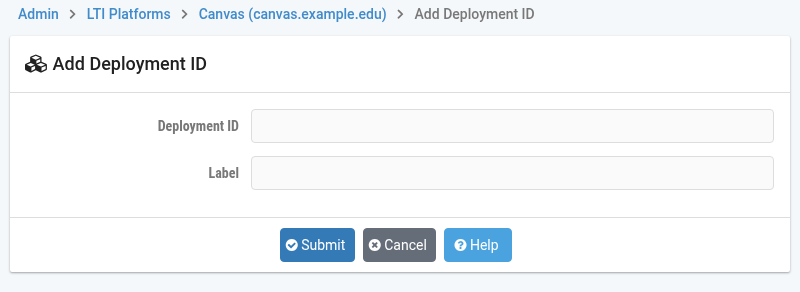
Enter the Deployment ID exactly as the LMS sends it,
optionally add a Label, and click Submit.
Field Descriptions
- Deployment ID:
The exact value the LMS sends, character for character.
- Label:
An optional note recording which installation this ID belongs to, such as “Canvas root account” or “BIO-101”. Used only to tell the entries apart.
- Recorded By:
Shown in the list. How the ID came to be registered: entered by an administrator, observed on a launch, or supplied by dynamic registration. It has no effect on launches.
- Community:
Shown in the list. The community that has claimed this deployment, or any community when none has. Claiming is done from the community’s settings; see Binding a Community to a Platform.
To edit a deployment’s label or remove it, use the caret dropdown on its row.
Warning
Removing a deployment ID refuses every launch that carries it. Any class
launching from that installation of the tool stops working until the ID is
registered again. A deployment that a community has claimed cannot be removed
until that community’s LTI 1.3 Deployment setting is changed.
Note
Reinstalling the tool in the LMS mints a new deployment ID. After a reinstall, the new ID has to be registered here, and claimed by the community if the old one was, before launches resume.