
LMS Integration (LTI)
NETLAB+ can be added to a Learning Management System (LMS) as an external tool using Learning Tools Interoperability (LTI), the 1EdTech (formerly IMS Global) standard for connecting an LMS to a learning application. Once the tool is connected, an instructor exports a class from NETLAB+ as a Common Cartridge and imports it into the LMS course. Each lab exercise then appears as a link in the course. When a learner follows one, NETLAB+ signs them in, enrolls them in the class if needed, opens the exercise, and, where the LMS asks for it, returns a grade when the lab is completed. Learners never need a separate NETLAB+ password.
NETLAB+ supports two versions of the standard. LTI 1.1 has been available for many years and continues to work unchanged. LTI 1.3, added as of version 25.3.1, is the current standard and is the version most institutions now require, because it replaces the shared-secret signing of 1.1 with public key cryptography. This section covers both, with an emphasis on setting up LTI 1.3.
How an Integration Works
The flow is the same for both versions of LTI. Three people are involved: the NETLAB+ administrator, the LMS administrator (often the same person), and the instructor who owns the class.
The NETLAB+ administrator enables LTI Integration on a community and, for LTI 1.3, registers the LMS as a platform and points the community at it.
The LMS administrator installs NETLAB+ as an external tool in the LMS, at the account or sub-account level, using the values NETLAB+ provides.
The instructor exports the class as a Common Cartridge from the class’s page in NETLAB+ and imports it into the LMS course. The cartridge contains one link per lab exercise, each already carrying the community and class it belongs to.
Learners open a lab link in the LMS. The LMS launches NETLAB+ with a signed message identifying the learner, the course and the exercise. NETLAB+ verifies it, creates or locates the learner’s account, adds them to the class roster, and opens the exercise.
If the link was placed as a graded assignment, NETLAB+ returns a grade to the LMS when the lab is completed, using the version of LTI the learner launched with.
Tip
The Common Cartridge is identical for LTI 1.1 and LTI 1.3. The LMS matches each exercise link to whichever NETLAB+ tool is installed in it, so a class exported for a 1.1 integration does not need to be re-exported when the LMS moves to 1.3.
LTI 1.1 and LTI 1.3
The two versions differ mainly in how the LMS proves to NETLAB+ that a launch is genuine, and therefore in what has to be configured on each side.
- LTI 1.1:
Each NETLAB+ community has its own Consumer Key and Shared Secret, entered on the community and again in the LMS. Every launch is signed with that secret (OAuth 1.0a with HMAC-SHA1). Because the secret is per community, a launch signed for one community can never enter another. Many institutions no longer accept SHA-1 signatures, which is the usual reason to move to 1.3.
- LTI 1.3:
The LMS is registered once with NETLAB+ as a platform. The two sides exchange public keys, and each launch carries a signed token that NETLAB+ verifies against the platform’s published key set. A platform registration is shared by every community that uses that LMS, and each community is simply pointed at it. Because there is no per-community secret, a community can optionally be narrowed to a single deployment ID when several communities share one LMS (see Key Concepts).
The version belongs to the launch, not to the community. NETLAB+ is never switched into a 1.1 mode or a 1.3 mode. A community can have both a Consumer Key and Shared Secret for 1.1 and a 1.3 platform assigned at the same time, and two classes in that community can launch under different versions. This is what lets an institution move courses to 1.3 one at a time, and it is also why a half-finished migration can go unnoticed (see Moving from LTI 1.1 to LTI 1.3 below).
Key Concepts for LTI 1.3
- Platform:
One registered LMS. A platform record holds the issuer, client ID and endpoint addresses the LMS uses, the LMS’s public key set, and NETLAB+’s own signing key for that LMS. Platforms are shared across communities and are managed on the
LTI Platformspage.- Dynamic Registration:
The recommended way to create a platform. The NETLAB+ administrator pastes a registration URL into the LMS; the LMS sends NETLAB+ its own details and issues a client ID. Nothing is completed until a NETLAB+ administrator reviews and approves the request on the
LTI Platformspage. A platform can also be registered by hand when an LMS does not support dynamic registration.- Deployment ID:
An identifier the LMS issues for each place NETLAB+ is installed as a tool: the root account, each sub-account, and each course that installs it separately. A platform owns the set of deployment IDs registered against it, and a launch is refused unless it carries one of them. NETLAB+ can capture the deployment ID from a launch attempt, which matters because some LMS products do not display it.
- Community platform assignment:
Each NETLAB+ community that launches under 1.3 is pointed at exactly one platform, in the
LTI 1.3 Platformfield on the community. A community set toNone (LTI 1.1 only)accepts only 1.1 launches.- Community deployment:
Optionally, a community can claim one of its platform’s deployment IDs in the
LTI 1.3 Deploymentfield. The rule is two-sided: that deployment can launch only into that community, and that community accepts launches from no other deployment. Leave this set toAny (no restriction)unless the LMS administrator installed NETLAB+ separately for each community (in Canvas, once per sub-account).- LMS identity:
The record that ties a learner’s LMS identity to their NETLAB+ account, one per account per LTI version. The identifier an LMS sends for a person can change, including on every existing user’s first 1.3 launch from Canvas, so NETLAB+ tracks identities explicitly and flags a conflict for an instructor or administrator to resolve rather than guessing or creating a duplicate account.
Where to Find Things
All LTI configuration is done from the administrator interface.
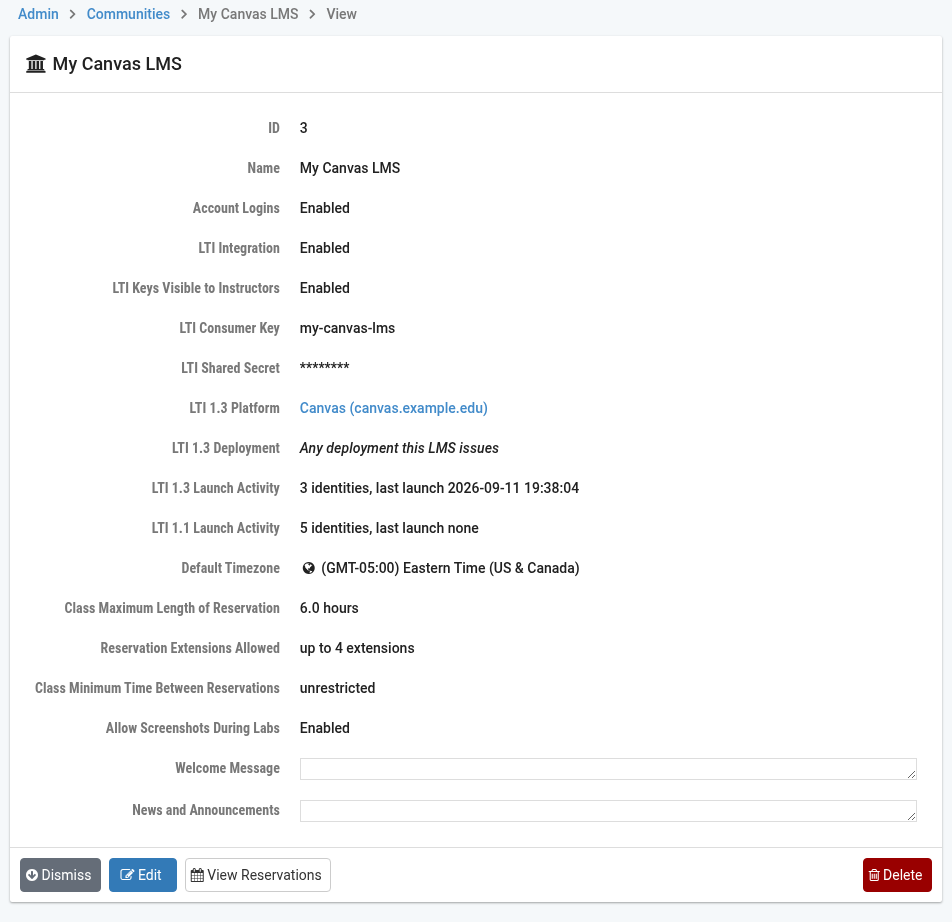
Community settings, including LTI Integration, the LTI 1.1
LTI Consumer Key and LTI Shared Secret, and the
LTI 1.3 Platform and LTI 1.3 Deployment fields, are on
each community’s page under > Communities.
Platform registrations, deployment IDs, dynamic registration requests,
and the addresses to give an LMS administrator are on the
LTI Platforms page, reached with the LTI Platforms
button at the bottom of the community list.
A community’s page shows, under its LTI settings, an
LTI 1.1 Launch Activity and LTI 1.3 Launch Activity
summary: how many identities have launched under each version and when the last
launch was. A version with no activity is shown as zero rather than omitted.
A user’s LMS identities, and any conflicts awaiting resolution, are on
the user’s account page under > Accounts.
Instructors export the Common Cartridge from the class’s page, in the
class manager. Whether they also see the community’s 1.1 Consumer Key and Shared
Secret there is controlled by the community’s
LTI Keys Visible to Instructors setting. Students are never shown
these keys.
Moving from LTI 1.1 to LTI 1.3
An existing 1.1 integration keeps working while 1.3 is set up alongside it. Nothing about the 1.1 keys or the exported cartridges has to change.
Warning
A leftover LTI 1.1 tool at the course level takes precedence in most LMS products over an LTI 1.3 tool installed at the account level, and the launches keep succeeding. From the learner’s seat nothing looks wrong, so it is easy to believe a course has moved to 1.3 when it has not.
After enabling 1.3 for a community, check the LTI 1.3 Launch Activity
row on the community’s page. If the 1.3 count stays at zero while the 1.1 count
keeps rising, the LMS course is still launching through the old tool. Remove or
disable the 1.1 external tool in that course, or at the level where it was
installed, and launch again.
The order of operations is:
Register the LMS as a platform on the
LTI Platformspage, preferably by dynamic registration, and record its deployment ID(s).Confirm the tool is enabled and available in the LMS. Dynamic registration in some products (Canvas among them) leaves the tool installed but not yet enabled.
Set the community’s
LTI 1.3 Platformto the new platform.Launch a lab link from the LMS course as a test user and confirm the community’s
LTI 1.3 Launch Activityrow increments.Once every course in the community launches under 1.3, the 1.1 tool can be removed from the LMS. The community’s Consumer Key and Shared Secret may be left in place; they are simply unused.
Requirements and Notes
Note
NETLAB+ is declared to the LMS once, with no placements. The tool’s launch address by itself names no community, class or exercise, so a course-menu or navigation placement pointing at it can only fail. The Common Cartridge places the links. An LMS left to its defaults may add placements of its own, including some that send a deep-linking request, which NETLAB+ does not support; remove them.
Note
The LMS must be allowed to send the learner’s name and email address. A launch that arrives without an email address is refused, because NETLAB+ uses it to provision the account. Canvas calls this a privacy level of public.
Note
One permission is enough. The only LMS service NETLAB+ calls is grade return. In Canvas the permission reads “Can create and update submission results for assignments associated with the tool”. Grant nothing else.
Note
Browser cookies. NETLAB+ opens inside the LMS page, in a frame. A learner whose browser blocks third-party cookies is shown the message “Cookies are not enabled” and asked to allow cookies for the NETLAB+ site in their browser settings. NETLAB+ cookies are erased when the browser is closed.